Wednesday, 2 September 2015

Volunteering at the Crisis allotment

Recently, a gardening crisis means fretting that it's been an age since I actually got out there & did something. But not today.

Work recently instigated a Corporate Social Responsibility programme, so we now get 2 days paid leave to do volunteer our services to anyone who will have us. A mate of mine works for Crisis so I put my name forward to do anything for them that didn't involve rattling a tin out on the streets. To my delight, they suggested I spend a day helping out on their allotment - score!

The Greenfingers project was set up 3 years ago by Cath, a therapist at NECA & keen gardener. Securing allotments is one of the dark arts, often a long game of patience. Cath side-stepped the usual wait using the traditional man-on-the-inside technique. A previous client already had a plot & put in a good word with the committee. In 3 years, Cath & her volunteers have transformed the vacant plot.

Recently, NECA have started collaborating with Crisis on the project, which is a great fit as the organisations have overlapping concerns. The volunteers at the garden are a mix of staff members, clients of NECA & Crisis, and their support workers. Dom is Cath's equivalent from Crisis, & he teaches DIY skills.

The main agenda for the day was: Paint the new shed. Installed recently as a classroom & bad weather bolt hole, their new shed is great, if controversial - the team are taking some heat from allotment neighbours about it, so we best get painting quick.


The rain kept off most of the morning & we got the lion's share of it done with me on the roller & my colleague Mick doing the fiddly bits by brush.

When Barry, a project client, arrived & looked like he wanted to join in the painting work, I handed over my roller & snapped a few pics.

I also got chatting to Alfie (the aforementioned man-on-the-inside) & he insisted on showing me around his own plot (mostly veg, small koi pond) & that of his neighbour (hens, dahlias). Alfie is in the middle of tidying up from a recent unwelcome visit - some vandals got in, smashed up a bunch of his pots, wrecked a number of plants. So sad, but he was remarkably chipper about it all. He also insisted I take a small round yellow courgette & a house plant.
Back at Greenfingers as a light drizzle started & it was lunchtime, provided by the Crisis Skylight Café. Some of the veg grown on the plot supplies the Café. The gardeners are also preparing to enter the Civic Show this weekend, so Cath was busy selecting & preparing the entries. Rest goes home with the volunteers.

Shower passed & sun back out, Mick got busy with a second coat of stain on the shed, while Barry & I moved on to riddling. Riddling. It's a great word. I remember my Dad using it, but couldn't remember what it meant.

Dom has made a series of raised beds. These are being filled from the spoil heap made when they dug the pond. But the spoil includes all manner of junk including rusty nails, broken glass, stones & huge lumps of clay.

By rubbing the soil over & through a wire mesh, we break up the bigger lumps & fish out the crud.

On the route between the heap & the bed, Barry pointed out to me a rain-filled bucket. The pond might not be finished yet but the pondlife has already moved in. An hour or so later, as we moved a bit of pond liner lying on top of the heap, we spotted a frog too.

By mid afternoon, Dom has finished building another bed. Barry & I riddled a first barrow-load into the new container before Cath called it a day. We wandered home with a bag each of allotment swag & the slight ache from doing something physical all day. I'll enjoy my stretches at yoga tonight.

Saturday, 23 May 2015

Multi-layered bulb pot

Last Autumn on Gardeners' World, Monty looked at getting a succession of flowers in a container by planting multiple layers of different bulbs. Seemed like a great plan to me. We inherited a few weedy pots with the house & the largest of these would be ideal for experimenting with this technique.

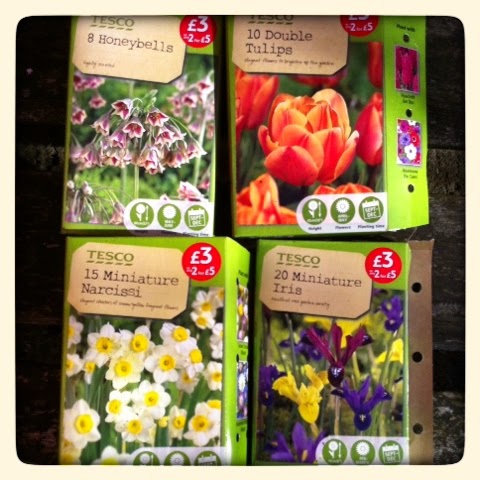
Then, I just happened to be mooching around a local supermarket when I spotted some Spring bulb offers. Little boxes of all sorts of things. I checked the flowering dates on the packets & picked 4 that would flower in sequence, if all went to plan.
2 for £5? I'll take 4 :D

*Edit* An eagle-eyed reader has pointed out that I haven't explained the planting arrangement. Sorry.
I thought I'd taken photos of the planting up but no. I may've hallucinated that bit. Deffo losing the plot.
Anyhoo: the bulbs' boxes suggested different planting depths. IIRC I put them in 3 layers: tulips on the bottom; then a middle layer of 2 types & a top layer of 1. I tried to place the bulbs so they weren't directly over each other, so the stems of the lower ones wouldn't displace the higher ones. As they were all due to flower separately, I placed them evenly around the pot, so it didn't look lopsided.

Sprout!


They're ALIVE!
Cut to... Spring & from the kitchen window we can see some shoots. Yay! They haven't all died horribly due to overcrowding. A good start.

First flowers up were the mini Iris:
Little irises...irii?
What absolute gems.

They all came out blue, not mixed as it said on the box, but I'm not complaining - they were beautiful.

The daffs also made a show but I forgot to take a photo. Sorry. The box says miniature, but that must refer to the flower head as these had long long necks. A nice surprise was that they were double headed, a bit like the Tete a tetes I bought the other year.

At the mo, these gorgeous tulips have just done over:
Golden globes
They should call this one Fruit Salad
I've not seen this type before, with circle after circle of petals. Stunning.

& we still have the honeybells to go. No sign of their flower heads just yet but the box says May-June so it may be Midsummer before we see them up here.

Thus far it's been a great show in front of the kitchen window, so I'm declaring the multi-bulb pot experiment a success :)

Sunday, 10 May 2015

Solidarity shed

Last year's house move meant some gains & some losses: we lost our greenhouse but we gained a shed.

We've not had a shed before, so that's quite exciting. The garage at the old house was mahoosive so most of the gardening stuff went in that: plenty of space, & alarmed too, in case some random scroat decided they just had to have our late 20th century flymo...

New garage is too small to house all the gardening stuff tho, so some of it had to go into the shed. But the shed was in a sorry state when we arrived: a leaky roof had left it sodden. It desperately needed some TLC.
Looking a little forlorn...

New hat

At some point it would be great to have a go at greening this roof, but new boards & felt will do for now.
New boards & felt

Thanks Hubby :)

The new roof gave the shed a chance to dry out, for the 1st time in many a year. Amazingly the walls & floor were still serviceable, so time for a smart new jacket.

Pick a paint scheme

Inspiration came from a couple of different sources:
  • Last Summer, a mate revamped her shed in fabulous beach hut style.
  • Also last Summer, Cuprinol had an ad of a little geezer buzzing round gardens, being sad at neglected sheds & delighted at brightly painted woodwork. Repainting the shed need not mean "Once all over in shit brown".
  • Sochi. Yep, the Winter Olympics. & Putin & his goons & their anti-gay laws. & then there's the ongoing state-by-state fight in the US for gay marriage. I'm still stunned that some folk get so het up about which people choose snog each other, & try to dictate who people fall in love with. I'm also amazed at the grace & humour with which the LGBT community campaign. So I've been feeling the need to fly the rainbow flag in solidarity... & cos it's the best flag :)

The LGBT rainbow flag has 6 colours, which is handy cos the shed is 18 planks high at its tallest. It's all coming together...

Supplies!

Down the shops I was delighted at the range of colours available. But it wasn't all about the aesthetics, I had some practical requirements too:
  • Water-based. I'm sick of the faff of oil-based paints. They smell bad, take ages to dry, require undercoats, are bad for your skin, are a bitch to clean off your brushes, then a special trip to the Household Waste Recovery Centre to get rid of the mucky thinners. Total palaver.
  • Stain, not paint. Paint will flake & I'm trying to keep maintenance to a miniumum... That might be optimistic but hey.
  • All colours from 1 range. This is a half-baked theory that, if they were designed as a set, they'll work better in combination & will weather consistently. Worth a punt...
Bit of a problem with the last rule: some ranges didn't have all the colours. So I took pics of the sample blocks:
That's none of yer shit brown...
And used Framatic to make my own colour chart:
& the winners are...

OK, so the red is the Coral it says on the tin, & the purple is actually Fushia pink, but I think it'll work.

Obligatory perspective tin line-up shot

Get cracking

When approaching jobs, I often like to do the hard bit 1st. It gets it out of the way whilst I've got the beans to tackle it, then I can coast when I'm knackered.

But not this job. This was done in a right old higgledy piggledy fashion.

Top down, to postpone scrabbling around on the floor

2 colours down - so far so good

I took the guttering off to paint behind - I'm not completely slapdash...

The back of the shed is shaded by the beech hedge. The boards got greener the closer they got to the floor. If I want vibrant colours all round, that'll need sanding back. Out with the power tools!

The flat sander is noisy but waaaaay quicker than sanding by hand

Some painting sessions involved sitting on the oil tank to do the window side:
The long reach radiator roller came in handy

What about the door?

Missed a bit...

The boards that make up the door don't neatly divide by 6. Continuing the horizontal stripe might work, but might look a mess if I can't do it well. Solid colour then? Would be a shame.

Then my mate Roger, an artist, had a suggestion: Offset vertical bands, a bit like Tetris. Genius!

Out with the chalk:
No formula here:
draw a line, then have a guess where the best place for the next line is

Yep, I think Roger's idea will work beautifully.

There will now be a whopping great intermission

That's as far as I got last year. I watched the unpainted wood get repeatedly drenched over the Winter, never getting the right combination of dry, warm (enough) & motivation. Pants. Have I mucked it up? Will the colours of next year look obviously different from this years? & is this just some lazy Grand Designs-esque fake jeopardy to inject some drama? (Clue: No)

Chip away at it

As the evenings lengthened this Spring, I tried to nibble away at it. Even if I did one colour on the door in an evening, it would still move the shed forward.

& it worked: in no time at all the door was done, along with a sneaky 2nd coat on (most of) last year's colours. Yay!
Wow the camera really blings some of the those colours...

So that's it then - all finished?

Well, not quite, cos the door wasn't the last bit. Nope, I'd avoided the whole side by compost corner. I managed to knock that off one sunny weekend.
Finished!
& I've not done the metalwork yet. Nor the inside... Hmm... there's a lot of spiders in there...

But the outside is done & looks better than I imagined. I posted a photo to Facebook & the Solidarity Shed got a whole lotta love. Thanks guys :D

The epilogue

While writing this post, we had sunshine with showers, & this happened:
Yay for April showers... in May


Paint the whole world with a rainbow :)

Wednesday, 11 March 2015

Compost corner

Just after we moved in last Easter, a friend offered us a spare compost bin. Great, I thought, I'll have no excuse not to turn the compost regularly if we've got 2 bins...

Should've known better - I only installed the 2nd bin this month. We've had it nearly a year.

The sticking point was getting around to buying a base plate (to let the worms in but keep the rats out). I finally ordered one a couple of weeks ago through GetComposting.com


& here it is in place:


(Yep, this muppet forgot to take a photo of the base plate in position & I only realised once the job was done.)

The big green ThermoKing we bought last year has been going great guns, although we still make the same composting beginner mistakes:
  • Too much grass in big layers.
  • Too many large stems not chopped up.
Despite our ineptitude, it soldiers on:

The plan is to use the King for the fresh stuff & the Dalek for the finishing stage. Advice I've seen recommends at least 3 bays but tended to only use 2 at the old place. We'll see how this arrangement goes & add a 3rd if need be.

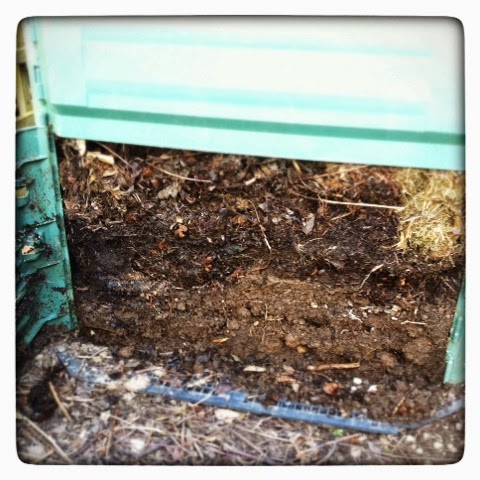
I opened the bottom doors front & back of the King; dug out the bottom layers & decanted them into the Dalek. The front hatch was easy to deal with, but the back hatch is in the beech boundary hedge. Like an idiot I managed to whack myself in the eye with an thin whippy beech twig. Ow..


No matter. Let's get this done. Who needs eyes anyhow...

With about an hour's heaving & shovelling, the compost was split:

When splitting the compost, I did notice a distinct lack of worms... Slugs, yes, & woodlice too, but not a single worm now I think about it. I wonder if the clay underneath the King is too compacted? Maybe I should invest in some worms...?

& talking of investments, as well as buying the base plate, I splurged on a new pokey stick... erm.. aerator. In the past I've just used the fork, but it can be tough to get down to the bottom & really stir the muck.

New stick has flaps that fold flat as you push down & then open out as you pull back, just like a child's ears in a set of railings.


(Photo shamelessly blagged from GetComposting)

With any luck, & a bit more prodding, we'll have bags of garden-ready compost & not a moment too soon - our claytastic soil will take all the organic matter we can throw at it.

Sunday, 1 March 2015

Early Spring blooms

Few things lift my heart quite like Spring's pioneers when they raise their beautiful heads from the cold ground.

Residents

The garden has a number of established early birds.

Snowdrops are up first, naturally:

We also have a giant variety:

Next up, the crocuses/crocii:
They're jewel-like in the low sunshine.

So chuffed this garden came with hellibores:

Still no clue what this shrub is: 

For most of the year it has kept on producing these clusters of white/pink flowers that go on to produce deep purple berries. What a trooper.
Update: Ali says Viburnum Tinus :)


Newcomers

On to things we've added since we moved in.
Hubby's pansies have soldiered through the Winter:


The 1st flowers have appeared in the 3 tier bulb pot I did last Autumn:
Many more to come, with any luck :)

Sunday, 11 January 2015

The Great British Garden Revival

I'm in my element this week with some proper armchair plant porn:

The Great British Garden Revival


The BBC's new series of The Great British Garden Revival kicked off this week, along with a bunch of other gardening shows (Big Allotment Challenge, also on the Beeb; Titchmarsh gadding about in ITV). I guess this glut is as we look forward to warmer times, just like the traditional New Year holiday adverts. Gotta say tho', everyone on Allotment Challenge looks very weird on my TV with their sunburn whilst it tries to snow outside my window.

Perfect format

Garden Revival is just the right mix of horti-TV for me: educational, inspirational & rallying. Each show gives us to 2 gardening 'faces'. Each has 30 minutes to exhort us to make space in our hearts for some old but unfashionable stallwarts that are at risk of extinction.

They give us some history on the plants, visit gardens with amazing collections, address the brutal truth of why we've stopped buying these plants, show us how we can overcome those hurdles, & then light a fire under our arses to get out there & save them.

Your country need you!

Each segment is a rallying cry. During episode 1, I was so buoyed up from Rachel de Thame's campaign for old roses, that when Joe Swift did his intro & asked us to make space for climbers & creepers is was shouting "Ok, Joe!" at the screen... I felt like Po in Kung Fu Panda at the Pool Of Sacred Tears (Go watch it. Not to understand this reference, just go watch it). James' Wong's section on Rhododendrons in episode 3 was a revelation - the invasiveness of ONE hybrid has poisoned our view of a whole species.

Series 2 episodes

There's 10 shows in this series, some of which are already on iPlayer. There really is something for everyone:
  1. Roses - Rachel de Thame
    Climbers & creepers - Joe Swift
  2. Daffodils - Carol Klein
    Blossom trees & shrubs - Chris Beardshaw
  3. Rhododendrons - James Wong
    Carnations - Christen Walkden
  4. Scented gardens - Toby Buckland
    Tulips - Tom Hart Dyke
  5. Lavender - Diarmund Gavin
    Knot gardens - Alys Fowler
  6. Irises - Rachel de Thame
    Ornamental grasses - Toby Buckland
  7. Conifers - Carol Klein
    Pelargoniums - Tom Hart Dyke
  8. Lilies - James Wong
    Woodland gardens - Christen Walkden
  9. Bog gardens - Joe Swift
    Soft fruit - Alys Fowler
  10. Wildlife gardens - Diarmund Gavin
    Peonies - Charlie Dimmock
Now, to see if I can convert this inspiration & enthusiasm into motivation... & a plan.